How to Send SMS OTP in Angular Using Reactive Forms (2026 Guide)
Build an Angular SMS OTP reactive forms integration step-by-step. Learn how to handle phone validation, resend cooldowns, and OTP verification in 2026.
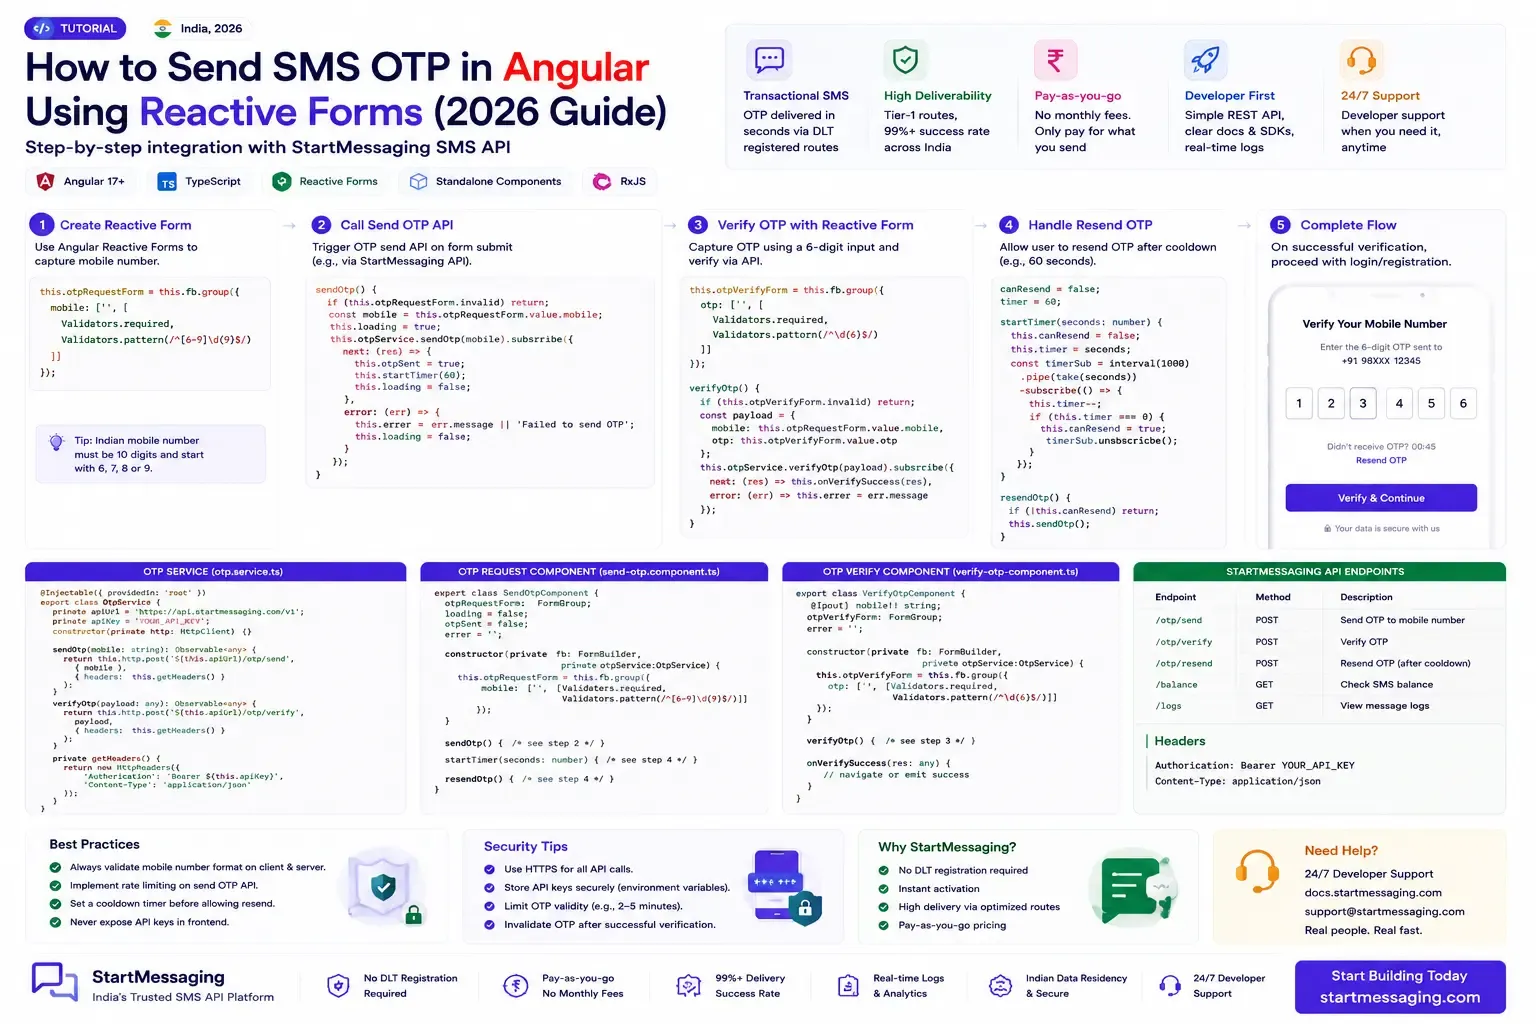
Divya, a senior frontend engineer at a Pune-based enterprise fintech platform, was refactoring her team’s merchant onboarding portal to Angular 19. Her team had initially constructed the phone authentication interface using simple template-driven forms. However, QA testing quickly exposed severe edge-case bugs: users were double-submitting verification requests during minor network latency, invalid 9-digit Indian mobile numbers were bypassing basic input checks, and the resend button remained active during active cooling windows. When Divya converted the flow to angular sms otp reactive forms, she used RxJS observables, explicit FormGroup validation rules, and structured HTTP service pipelines to turn a fragile template into a battle-tested, type-safe authentication state machine.
For enterprise software teams standardizing on Angular, building robust OTP verification screens requires more than binding an input field to a string variable. You need strict client-side validation for 10-digit Indian phone numbers (+91), automated resend cooldown timers, disable-on-submit button states, and clean error handling for rate-limited API calls. This step-by-step tutorial walks through building a production-ready Angular SMS OTP component using Reactive Forms and the StartMessaging OTP API.
Architecture of a Reactive Forms OTP Flow
Before writing code, examine how data and validation states flow between your Angular component, Reactive Form controls, and the StartMessaging backend API.
┌───────────────────────────────────────────────────────────────────────────────────┐
│                        Angular Reactive OTP Architecture                          │
├───────────────────────────────────────────────────────────────────────────────────┤
│ [User Types Phone Number] ──> [FormControl: Validators.pattern(/^[6-9]\d{9}$/)]    │
│                                           │ (Valid 10-Digit Indian Mobile)         │
│                                           ▼                                       │
│ [Click 'Send OTP'] ─────────> [OtpService: POST /otp/send]                         │
│                                           │ (Stores requestId, starts 60s timer)  │
│                                           ▼                                       │
│ [UI Switches to OTP State] ─> [FormControl: Validators.pattern(/^\d{6}$/)]        │
│                                           │ (User Enters 6-Digit Code)            │
│                                           ▼                                       │
│ [Click 'Verify OTP'] ───────> [OtpService: POST /otp/verify]                      │
│                                           │                                       │
│                     ┌─────────────────────┴─────────────────────┐                 │
│                     ▼                                           ▼                 │
│            [Status 200: Success]                       [Status 400: Retry]        │
│            (Navigate to Dashboard)                     (Display Error Message)    │
└───────────────────────────────────────────────────────────────────────────────────┘
Key Technical Advantages of Reactive Forms for OTPs
- Synchronous Validation Guarantees: Reactive forms allow you to enforce regex checks (e.g., verifying that Indian mobile numbers begin with
6,7,8, or9) synchronously before firing expensive API requests. - Immutable Form State: Reactive form controls expose explicit
status,valueChanges, anddisabledstates, making it simple to prevent double-submits while an HTTP request is in-flight. - RxJS Operator Integration: You can cleanly map timer countdowns, handle API retries, and manage component unmount cleanup using RxJS operators like
switchMap,timer, andtakeUntilDestroyed.
Prerequisites
Before starting this tutorial, ensure your development environment includes:
- Node.js 18+ installed on your workstation.
- Angular 17+ or 19 CLI (
npm install -g @angular/cli). - A StartMessaging Account: Sign up for free to get API access.
- A StartMessaging API Key: Generated from the API Keys dashboard (starts with
sm_live_).
Step 1: Create a Feature Module or Standalone Component
Modern Angular applications leverage standalone components for lightweight dependency trees. Create a new Angular workspace or generate a standalone component in your existing project:
ng g component components/phone-otp-login --standaloneEnsure your Angular application imports ReactiveFormsModule and provideHttpClient() in app.config.ts (or main.ts):
// src/app/app.config.ts
import { ApplicationConfig, provideZoneChangeDetection } from '@angular/core';
import { provideRouter } from '@angular/router';
import { provideHttpClient } from '@angular/common/http';

export const appConfig: ApplicationConfig = {
  providers: [
    provideZoneChangeDetection({ eventCoalescing: true }),
    provideHttpClient(),
  ],
};
Step 2: Build the OtpService
Create a dedicated Angular service to handle HTTP interactions with the StartMessaging API. This service abstracts POST /otp/send and POST /otp/verify endpoints.
ng g service services/otpPaste the following TypeScript implementation into src/app/services/otp.service.ts:
// src/app/services/otp.service.ts
import { Injectable, inject } from '@angular/core';
import { HttpClient, HttpHeaders } from '@angular/common/http';
import { Observable, catchError, throwError } from 'rxjs';

export interface SendOtpRequest {
  phoneNumber: string; // E.164 format, e.g. "+919876543210"
}

export interface SendOtpResponse {
  success: boolean;
  data: {
    requestId: string;
    expiresAt: string;
    attemptsLeft: number;
  };
  message?: string;
}

export interface VerifyOtpRequest {
  requestId: string;
  code: string;
}

export interface VerifyOtpResponse {
  success: boolean;
  message: string;
}

@Injectable({
  providedIn: 'root',
})
export class OtpService {
  private http = inject(HttpClient);
  private baseUrl = 'https://api.startmessaging.com';

  // Replace with your actual live API key or load from environment
  private apiKey = 'sm_live_xxxxxxxxxxxxxxxxxxxx';

  private getHeaders(): HttpHeaders {
    return new HttpHeaders({
      'Content-Type': 'application/json',
      'X-API-Key': this.apiKey,
    });
  }

  /**
   * Triggers an SMS OTP delivery call to the target phone number
   */
  sendOtp(phoneNumber: string): Observable<SendOtpResponse> {
    // Format to E.164 if missing country code
    const formattedPhone = phoneNumber.startsWith('+') ? phoneNumber : `+91${phoneNumber}`;

    return this.http.post<SendOtpResponse>(
      `${this.baseUrl}/otp/send`,
      { phoneNumber: formattedPhone },
      { headers: this.getHeaders() }
    ).pipe(
      catchError((error) => {
        const errorMsg = error.error?.message || 'Failed to send OTP. Please try again.';
        return throwError(() => new Error(errorMsg));
      })
    );
  }

  /**
   * Verifies the 6-digit user code against the active requestId
   */
  verifyOtp(requestId: string, code: string): Observable<VerifyOtpResponse> {
    return this.http.post<VerifyOtpResponse>(
      `${this.baseUrl}/otp/verify`,
      { requestId, code },
      { headers: this.getHeaders() }
    ).pipe(
      catchError((error) => {
        const errorMsg = error.error?.message || 'Invalid or expired OTP code.';
        return throwError(() => new Error(errorMsg));
      })
    );
  }
}
Step 3: Implement Component Logic with Reactive Forms
Now open your standalone component src/app/components/phone-otp-login/phone-otp-login.component.ts. We will construct two form groups: phoneForm and otpForm.
We also incorporate an RxJS resend timer (60 seconds) to enforce cooling periods between verification attempts.
// src/app/components/phone-otp-login/phone-otp-login.component.ts
import { Component, OnInit, OnDestroy, inject } from '@angular/core';
import { CommonModule } from '@angular/common';
import { ReactiveFormsModule, FormBuilder, FormGroup, Validators } from '@angular/forms';
import { OtpService } from '../../services/otp.service';
import { Subscription, timer } from 'rxjs';
import { takeWhile } from 'rxjs/operators';

export type StepState = 'PHONE_INPUT' | 'OTP_INPUT' | 'VERIFIED';

@Component({
  selector: 'app-phone-otp-login',
  standalone: true,
  imports: [CommonModule, ReactiveFormsModule],
  templateUrl: './phone-otp-login.component.html',
  styleUrls: ['./phone-otp-login.component.css'],
})
export class PhoneOtpLoginComponent implements OnInit, OnDestroy {
  private fb = inject(FormBuilder);
  private otpService = inject(OtpService);

  step: StepState = 'PHONE_INPUT';
  isLoading = false;
  errorMessage = '';
  successMessage = '';

  requestId = '';
  cooldownSeconds = 0;
  private timerSub?: Subscription;

  // Form Group 1: Phone Input (Validates 10-digit Indian Mobile Numbers starting with 6-9)
  phoneForm: FormGroup = this.fb.group({
    phone: ['', [Validators.required, Validators.pattern(/^[6-9]\d{9}$/)]],
  });

  // Form Group 2: 6-Digit OTP Code Input
  otpForm: FormGroup = this.fb.group({
    code: ['', [Validators.required, Validators.pattern(/^\d{6}$/)]],
  });

  ngOnInit(): void {}

  ngOnDestroy(): void {
    this.stopCooldownTimer();
  }

  // Getters for template validation checks
  get phoneControl() {
    return this.phoneForm.get('phone');
  }

  get codeControl() {
    return this.otpForm.get('code');
  }

  /**
   * Step 1: Send OTP handler
   */
  onSendOtp(): void {
    if (this.phoneForm.invalid) {
      this.phoneForm.markAllAsTouched();
      return;
    }

    this.isLoading = true;
    this.errorMessage = '';
    const rawPhone = this.phoneControl?.value;

    this.otpService.sendOtp(rawPhone).subscribe({
      next: (res) => {
        this.isLoading = false;
        this.requestId = res.data.requestId;
        this.step = 'OTP_INPUT';
        this.successMessage = `OTP sent successfully to +91 ${rawPhone}`;
        this.startCooldownTimer(60);
      },
      error: (err) => {
        this.isLoading = false;
        this.errorMessage = err.message;
      },
    });
  }

  /**
   * Step 2: Verify OTP handler
   */
  onVerifyOtp(): void {
    if (this.otpForm.invalid || !this.requestId) {
      this.otpForm.markAllAsTouched();
      return;
    }

    this.isLoading = true;
    this.errorMessage = '';
    const code = this.codeControl?.value;

    this.otpService.verifyOtp(this.requestId, code).subscribe({
      next: (res) => {
        this.isLoading = false;
        this.step = 'VERIFIED';
        this.successMessage = 'Phone number verified successfully!';
      },
      error: (err) => {
        this.isLoading = false;
        this.errorMessage = err.message;
      },
    });
  }

  /**
   * Resend OTP Action
   */
  onResendOtp(): void {
    if (this.cooldownSeconds > 0 || this.isLoading) return;
    this.otpForm.reset();
    this.onSendOtp();
  }

  /**
   * Change Phone Number Action
   */
  onChangePhone(): void {
    this.stopCooldownTimer();
    this.step = 'PHONE_INPUT';
    this.otpForm.reset();
    this.errorMessage = '';
    this.successMessage = '';
  }

  /**
   * Starts RxJS 1-second countdown timer for resend button
   */
  private startCooldownTimer(seconds: number): void {
    this.stopCooldownTimer();
    this.cooldownSeconds = seconds;

    this.timerSub = timer(0, 1000)
      .pipe(takeWhile(() => this.cooldownSeconds > 0))
      .subscribe(() => {
        this.cooldownSeconds--;
      });
  }

  private stopCooldownTimer(): void {
    if (this.timerSub) {
      this.timerSub.unsubscribe();
    }
  }
}
Step 4: Construct the Component HTML Template
Open src/app/components/phone-otp-login/phone-otp-login.component.html and render the reactive forms with validation feedback:
<!-- src/app/components/phone-otp-login/phone-otp-login.component.html -->
<div class="otp-card">
  <h2>Mobile Authentication</h2>
  <p class="subtitle">Fast & secure OTP login for Indian mobile numbers</p>

  <!-- Global Error Alert -->
  <div *ngIf="errorMessage" class="alert alert-error">
    {{ errorMessage }}
  </div>

  <!-- Global Success Alert -->
  <div *ngIf="successMessage" class="alert alert-success">
    {{ successMessage }}
  </div>

  <!-- STEP 1: Phone Number Input Form -->
  <form *ngIf="step === 'PHONE_INPUT'" [formGroup]="phoneForm" (ngSubmit)="onSendOtp()">
    <div class="form-group">
      <label for="phone">Enter 10-Digit Mobile Number</label>
      <div class="input-prefix-group">
        <span class="prefix">+91</span>
        <input
          id="phone"
          type="tel"
          formControlName="phone"
          placeholder="9876543210"
          maxlength="10"
          [class.invalid]="phoneControl?.touched && phoneControl?.invalid"
        />
      </div>

      <div *ngIf="phoneControl?.touched && phoneControl?.invalid" class="field-error">
        <small *ngIf="phoneControl?.errors?.['required']">Mobile number is required.</small>
        <small *ngIf="phoneControl?.errors?.['pattern']">Enter a valid 10-digit Indian mobile number (starts with 6-9).</small>
      </div>
    </div>

    <button type="submit" [disabled]="phoneForm.invalid || isLoading" class="btn btn-primary">
      <span *ngIf="!isLoading">Send Verification Code</span>
      <span *ngIf="isLoading">Sending OTP...</span>
    </button>
  </form>

  <!-- STEP 2: 6-Digit OTP Verification Form -->
  <form *ngIf="step === 'OTP_INPUT'" [formGroup]="otpForm" (ngSubmit)="onVerifyOtp()">
    <div class="form-group">
      <label for="code">Enter 6-Digit OTP</label>
      <input
        id="code"
        type="text"
        formControlName="code"
        placeholder="123456"
        maxlength="6"
        autocomplete="one-time-code"
        [class.invalid]="codeControl?.touched && codeControl?.invalid"
      />

      <div *ngIf="codeControl?.touched && codeControl?.invalid" class="field-error">
        <small *ngIf="codeControl?.errors?.['required']">Verification code is required.</small>
        <small *ngIf="codeControl?.errors?.['pattern']">OTP must be exactly 6 digits.</small>
      </div>
    </div>

    <button type="submit" [disabled]="otpForm.invalid || isLoading" class="btn btn-primary">
      <span *ngIf="!isLoading">Verify & Continue</span>
      <span *ngIf="isLoading">Verifying...</span>
    </button>

    <div class="action-row">
      <button
        type="button"
        class="btn-link"
        [disabled]="cooldownSeconds > 0 || isLoading"
        (click)="onResendOtp()"
      >
        <span *ngIf="cooldownSeconds > 0">Resend OTP in {{ cooldownSeconds }}s</span>
        <span *ngIf="cooldownSeconds === 0">Resend OTP</span>
      </button>

      <button type="button" class="btn-link text-muted" (click)="onChangePhone()">
        Change Number
      </button>
    </div>
  </form>

  <!-- STEP 3: Verification Complete Screen -->
  <div *ngIf="step === 'VERIFIED'" class="verified-box">
    <div class="checkmark-icon">✓</div>
    <h3>Authentication Successful</h3>
    <p>Welcome back! Redirecting to your merchant dashboard...</p>
  </div>
</div>
Step 5: Add Component Styles
Add simple CSS in phone-otp-login.component.css for a clean interface:
/* src/app/components/phone-otp-login/phone-otp-login.component.css */
.otp-card {
  max-width: 420px;
  margin: 40px auto;
  padding: 32px;
  background: #ffffff;
  border-radius: 12px;
  box-shadow: 0 4px 20px rgba(0, 0, 0, 0.08);
  font-family: system-ui, -apple-system, BlinkMacSystemFont, 'Segoe UI', Roboto, sans-serif;
}

.subtitle {
  color: #666;
  font-size: 0.9rem;
  margin-bottom: 24px;
}

.input-prefix-group {
  display: flex;
  align-items: center;
  border: 1px solid #ccc;
  border-radius: 6px;
  overflow: hidden;
}

.prefix {
  background: #f3f4f6;
  padding: 10px 14px;
  font-weight: 600;
  color: #374151;
  border-right: 1px solid #ccc;
}

input {
  width: 100%;
  padding: 10px 14px;
  border: none;
  font-size: 1rem;
  outline: none;
}

input.invalid {
  background-color: #fff5f5;
}

.field-error {
  color: #dc2626;
  margin-top: 6px;
}

.btn {
  width: 100%;
  padding: 12px;
  border-radius: 6px;
  border: none;
  font-weight: 600;
  cursor: pointer;
  margin-top: 16px;
}

.btn-primary {
  background: #0284c7;
  color: #fff;
}

.btn-primary:disabled {
  background: #94a3b8;
  cursor: not-allowed;
}

.action-row {
  display: flex;
  justify-content: space-between;
  margin-top: 16px;
}

.btn-link {
  background: none;
  border: none;
  color: #0284c7;
  cursor: pointer;
  font-size: 0.85rem;
}

.btn-link:disabled {
  color: #94a3b8;
  cursor: not-allowed;
}

.alert {
  padding: 10px 14px;
  border-radius: 6px;
  margin-bottom: 16px;
  font-size: 0.88rem;
}

.alert-error {
  background: #fef2f2;
  color: #991b1b;
  border: 1px solid #fecaca;
}

.alert-success {
  background: #f0fdf4;
  color: #166534;
  border: 1px solid #bbf7d0;
}

.verified-box {
  text-align: center;
  padding: 20px 0;
}

.checkmark-icon {
  font-size: 3rem;
  color: #16a34a;
}
Testing the Angular Integration
To test your component locally without sending real SMS traffic during automated test suites:
- Run
ng servein your terminal. - Open
http://localhost:4200in your browser. - Enter a 10-digit Indian test number (e.g.,
9876543210). - Verify that entering 9 digits keeps the submit button disabled.
- Upon submitting, confirm that
requestIdis logged and the form switches smoothly to the OTP entry state.
For staging environments, StartMessaging provides test phone numbers that return predictable mock OTP codes without deducting wallet credit.
Frequently Asked Questions
Q: Why use Reactive Forms over Template-Driven Forms for Angular OTP inputs?
A: Reactive Forms provide synchronous control validation, explicit reactive observables (valueChanges, statusChanges), and immutable data flow. This prevents double-submits, simplifies complex regex pattern checks, and makes unit testing component forms straightforward.
Q: How does Angular handle SMS OTP autofill on mobile devices?
A: By adding autocomplete="one-time-code" to your 6-digit OTP <input> element, mobile browsers on iOS (Safari) and Android (Chrome) automatically prompt users to autofill incoming verification codes directly from SMS messages.
Q: What is the recommended resend cooldown duration for SMS OTPs in India?
A: TRAI guidelines and network security best practices recommend enforcing a 60-second cooldown timer between resend requests. This prevents rate-limiting penalties, protects your API wallet from SMS pumping bots, and reduces unnecessary carrier costs.
Q: Do I need DLT registration to test Angular OTP flows with StartMessaging?
A: No. StartMessaging routes verification traffic through pre-approved enterprise DLT headers, allowing developers to send and verify SMS OTPs in Angular immediately without registering personal DLT entity accounts or templates.
Q: How do I securely store the StartMessaging API key in Angular?
A: You should never expose sm_live_ API keys directly in client-side Angular bundle code. In production, route sendOtp and verifyOtp calls through a lightweight backend gateway (such as a Node.js Express service, Next.js API route, or AWS Lambda) that holds the API key securely in server environment variables.
By refactoring her merchant onboarding flow to Angular Reactive Forms and integrating StartMessaging’s OTP API, Divya eliminated client-side state bugs, added automatic 60-second resend throttling, and cut OTP drop-off rates across Pune merchant sign-ups. If you are building authentication screens in Angular, get started with StartMessaging — create your free account today and send your first 100 SMS OTPs with zero DLT registration delays.
StartMessaging Team
StartMessaging Team